Tuesday, October 30, 2012

Adventure Down the Rabbit Hole, Part 3: The Queen's Bodice

An Alice in Wonderland needs a Red Queen. As I mentioned before, my oldest decided that she preferred the costume worn by Helena Bonham Carter in the recent Tim Burton version of the classic tale, rather than the standard animated Disney version. I don't blame her - the Tim Burton costume is far more interesting. It is, however, quite an undertaking but since I'm not one to shrink from a challenge, I went with it.

First, we decided on a pattern for a jumping-off point. Simplicity actually makes a pattern for the Red Queen and Alice, based on the movie costumes but I didn't like it and neither did Miss Maeve. It doesn't really do a good job of copying what you see in the film. So I decided to go with McCall's 5954, view E. It has the same type of sleeve as the original, and though it doesn't have a separate corset bodice, I can give it the illusion of one.

The skirt isn't the same as the original, but I'm loathe to have her dragging a full-length overskirt around. I made a sketch to indicate the changes. I'm no fashion illustrator, but you get the idea.

As you can see, there are some small differences from the original. First, I decided to add some hearts in order to make it more recognizable as the Queen of Hearts. My daughter, apparently, doesn't like the idea of being called the Red Queen, since that's a reference to the other Alice book, Through the Looking Glass. The movie happens to be an amalgam of the two, but that's another blog post altogether. Anyway, I figured that not everyone had seen the movie or might remember the costume, so we added a heart at the center of the bodice front, and then hearts along the bottom of the skirt. The original costume has a velvet bodice, with a gold silk center panel. I had some leftover black velvet from another project in my vast fabric stash, so I used that and made the center portion from gold damask upholstery fabric.

The gold is darker than the original costume, but it's as close as I could get without spending a fortune. I couldn't tell from photos online what kind of fabric the over-sleeves were made from, so I went with black taffeta from my stash. The under-sleeve of the original is a black net with an underlining of a light gold fabric. I substituted a bonded lace fabric for this, and it works pretty well.


Of course, the sleeves themselves are decorated with fred ribbons, both on the puffed over-sleeve and on the longer under-sleeve. The originals have some kind of black embellishment on them and I couldn't tell if it was sequins, beads or something entirely different. I decided to use a combination of black sequins and black ribbon roses, and the effect is pretty similar to the original:

I did all this bead and sequin work by hand. It's taken me a while to do it, since I have to do each one individually, but I've been doing this embellishment while waiting for the small ones at gymnastics lessons, and even did some while Miss Maeve was at an Irish dance competition and wasn't dancing. Of course I stopped sewing to watch her dance. Eventually there will be beading on the top portion and all kids of wonderfulness - I hope. I'm kind of running out of time! But I have all morning and afternoon to finish this, plus time at gymnastics tonight, which should be enough, as long as I can get the White Rabbit done today. That one is going together pretty quickly, thankfully.


Friday, October 26, 2012

Adventure Down the Rabbit Hole, Pt. 2 - Alice


I was planning on starting my Wonderland costume extravaganza with the Queen of Hearts, but that would mean that I need my oldest to be able to drop what she's doing every couple of minutes so that I can fit the muslin of the dress bodice and she's been inundated with homework. Ah, the travails of middle schoolers! Since she wasn't really available, I moved on to the Alice costume, since I knew it would require a bit of hand work for the hems and lining, and I like to have hand sewing to do whilst the small ones are at gymnastics and I sit in the bleachers, watching them.

I made a few alterations to this pattern to make it look the way that I wanted, but not a lot. The only change I made to the dress was the addition of a collar. There are many Alice patterns out there and the one I wanted had a dress with a collar and a separate pinafore. That one wasn't available at my local JoAnn's at the time, so I went with this one:

As you can see, this dress doesn't have a collar and the pinafore is not a separate piece. This pattern actually calls for the bib to be sewn directly to the bodice, with the apron skirt being a separate piece, sewn to a ribbon and then tied around the waist. I knew my Gwyneth was not about to go for that, since she is a stickler for authenticity as much as I am. I recalled a shirt in one of my back issues of Ottobre which has a similar collar and traced that out, but when I tried to see how it would fit with the dress neckline, it was clear that it wasn't going to work. So I skimmed through some other issues with the vague notion that there was a dress with a peter pan collar in one and, to my delight, found this dress:

I traced off the collar piece and added giant seam allowances. Normally I use a 1cm seam allowance with Europeans patterns, but the dress pattern had standard 5/8" seams, so I used that width in order to keep everything the same. The first try didn't work when I tried to attach it to the dress - the curve was too deep for it to lie properly. So I cut off the entire seam allowance and re-pinned it and found that it was the perfect size. Thank goodness, because I didn't have enough of the blue to make another one and was reluctant to go buy more. A make it work moment that worked out.


The pinafore was a different story. First, I curved the neckline slightly and used the size 7-8 for the bib. I wanted the bib to be in front and in back, so I cut 4 pieces and sewed the shoulders together in pairs, then stitched them together along the outer edges. Next I turned them right side out and used bias tape to bind the neckline. Unfortunately for me, the bias tape is slightly yellower in color than the bib of the pinafore, but I didn't notice that until I had sewn it on all the way. It really looked white when held next to the bib, so I'm not sure why there is that subtle color difference. Anyway, I used the pattern piece to cut the correct length of apron but I used the entire width of my fabric in order to make the apron skirt fuller. This was important to me, since the skirt of the dress is really quite full and I felt that the narrower width looked kind of skimpy against it. I gathered the top edge, then sewed narrow hems at the sides.

The pattern calls for a wide ribbon but my kids like their Halloween costumes to be dress-up clothing, and that means they get washed. Ribbons don't launder well, so I made a waist tie out of the same white muslin as the apron skirt and bib. I interfaced the portion that would be sewn to the skirt and bib, then sewed the skirt to one side and the bib to the other. I kind of just made it up as I went along, though I did use the pattern pieces as a guide.


All in all, a highly successful costume, in my opinion. The thing that was great about this one was that it did require a little bit of hand finishing, which allowed me to have some sewing to do while I watch the kids at gymnastics. I hate sitting there with nothing to do and I always feel like I'm wasting time that could be spent in front of my machine. Now that Alice is done, I'm moving on to the Red Queen. I lucked out, because Maeve is getting big enough that I don't have to do as many alterations to the adult-sized pattern in order to make it fit her, so I can pretty much just start cutting out. But I'll talk about that in a different post.

Thursday, October 4, 2012

An Adventure Down the Rabbit Hole, Pt. 1

So it's that time of year again - fall. And that means Halloween is just around the corner, so you know that I'm getting ready to start on a massive amount of costume sewing. Every year, it seems, the costumes get more and more elaborate and I suspect I missed my calling somewhere along the line. This year's sewing promises to be no exception, since the 3 have decided to go as characters from a popular book/movie. And not just any characters, oh no. They have chosen one of the most iconic children's books and characters out there. And no, I'm not talking The Hunger Games and Katniss, although I'm sure Maeve would jump at that if given the chance and she quickly spotted a pattern for it in a pattern book at JoAnn's. No, I'm talking Alice in Wonderland, and the characters of Alice, the Queen of Hearts/Red Queen, and the White Rabbit.

Now, given the ages of my children, it's clear who is dressing as Alice and the White Rabbit and it makes sense. Their costumes really won't be difficult to make, although I plan on making some changes/additions, as always. For T I'll be using the standard McCall's pattern # 6101 for the bunny suit, but I'll also be making a waistcoat (aka, a vest) with a large pocket for his pocket watch (which I am making out of wood) and we'll also have a bow tie or ascot. I'm leaning towards bow tie as that's the iconic Disney animated image; Scott seems to have a fondness for the ascot idea, since the newer Tim Burton version has the rabbit dressed in a shortened version of a frock coat, worn with a waistcoat underneath and a jabot of lace at the throat. My 3 year-old son is probably not going to tolerate a jabot of lace, though he may tolerate an ascot. He's already running around saying, "I'm late! I'm late!"

For Miss G I've also chosen a McCall's pattern, # 4948, mostly because the Simplicity one with the collar wasn't in stock at the JoAnn's I go to and I wasn't waiting for it. Naturally the dress fabric is a lovely sky-blue cotton with a white cotton muslin pinafore. I plan on adding the peter pan collar to the dress, and I'll be making real ties for the apron, rather than using the ribbon ties that the pattern instructions say to use. Add white tights, black Mary Janes and a black headband and you've got classic Alice.

The real challenge, though, is Maeve. She decided to dress as the Queen of Hearts but she wasn't really sure that she wanted to go with the animated version's costume, since she really liked the more Elizabethan look of Helena Bonham-Carter's Red Queen. (photo via: http://alice2010.blogspot.com/2009_07_01_archive.html)


After looking at patterns from which to base this look, I chose 
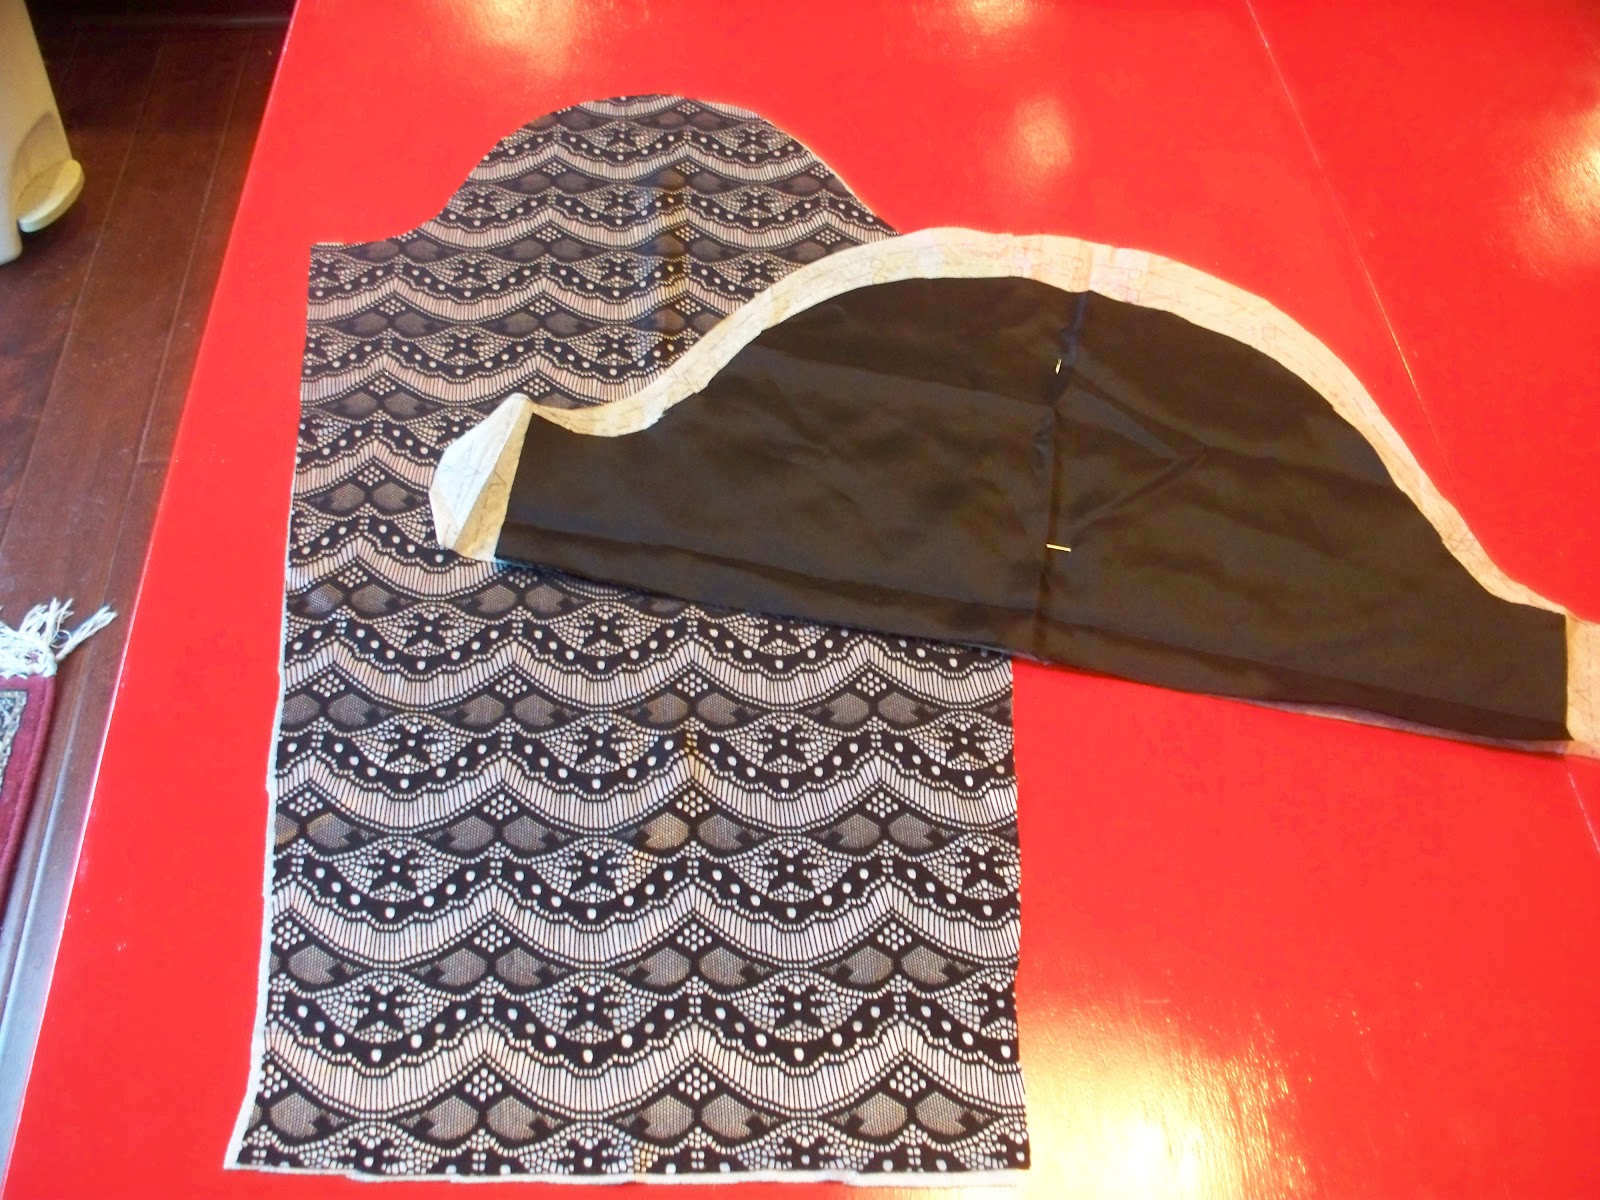
McCall's 5954, and then started to think about modifications that would make it look more like the photo above. First, we decided to use black for the bodice, except for the middle portion, which will be gold, with red ribbons to imitate the cording on the corset-style bodice of the movie costume. The sleeve puffs will also be black - either in taffeta or velvet, depending on whether I have enough black velvet in my stash, although taffeta will probably hold the shape better than rayon velvet. The red ribbon trim on the sleeves has some sort of black embellishment but we couldn't find any ribbon like it, so we've decided to sew black ribbon roses to the red ribbon in order to achieve a similar look. The lower half of the original's sleeve is a netting; I found a remnant of light beige-y fabric with a lace overlay that is very similar in look, and also more practical for trick-or-treating on an October evening. The cuffs look like they're made from a dotted chiffon, cut on the bias, but so far I haven't been able to find anything similar to it in the store. Looks like a trip to Hancock Fabrics might be in order. In the meantime, I've seen others' copies of this outfit which have used ruffled eyelet trim, but I think that the cotton looks a bit cheap next to the other types of fabric, even if it does give a similar look. Also, I'm going to have to add some black panels and the white shirt collar portion to the bodice. The only thing I really have to worry about is the size of the collar, but that shouldn't be too difficult to reproduce. I'm also considering a slight deviation from the movie dress by adding a large heart appliqué on the bodice, in order to inject more of the red/hearts theme.

The skirt portion will be more difficult to imitate. In the movie costume, the Red Queen has a red underskirt, with the front panel made of a red with a heart motif in black and gold, and an overskirt in a gold brocade. The pattern I chose has an overskirt that is shorter and draped - more like a polonaise, though they refer to it as a peplum, for some reason.

Dress with a polonaise, via http://historicalfashion.tumblr.com/

I could alter the pattern so that my version has a longer overskirt and then the underskirt, but there are 2 difficulties that present themselves if I do that:

1) This means more fabric, which is expensive and impractical when it comes to a Halloween costume for a 12 year-old. If this were something for a convention, like DragonCon or some other mega event where people would be judging her on a costume's authenticity, then I might. But's Halloween and she needs to be able to move. Also, she'll probably want to wear this at the next feis for Irish Dance, since they're having a costume special event. Extra fabric would get in the way, and I'll need to be able to drape the underskirt up à la polonaise just so that she can dance the reel in it.
2) A large overskirt would require hip rolls to support it, as Maeve has no exactly got large hips. I have no desire to make hip rolls for her to wear or to ask her to wear them. So I'm going with the shorter overskirt.

In order to achieve a similar look to the movie costume, we decided to use a dark gold brocade for all but the front panel of the long skirt. The front panel will be red taffeta with a flocked vine design in black. The shorter draped overskirt will probably be black, but we haven't finalized that. Also, we're giving a nod to the traditional Queen of Hearts' costume with heart appliqués on the skirt. Normally they're on the front panel but we decided to place them around the hem. While this is a departure from the Tim Burton costume, it's a way to reference the more traditional Alice that the other 2 costumes follow. Plus, it's a way of making our own statement, since there's always a risk that people won't make the connection to the newer movie and end up thinking that she's just a queen.

I'm also going to be on the lookout for lace-up granny boots at the thrift store that I can spray-paint gold, and I'll be looking for striped tights or something similar. I'm going to try to document the process of these costumes as much as possible, though I can't promise every detail will be photographed, since I frequently don't know where my camera is. I'll try, though. On with the sewing!

Tuesday, September 25, 2012

Cookie Monster

These are about 4 or 5 inches in diameter.

On second thought, better make that Monster Cookies, because they're huge! I'm always looking for things that my husband, Scott, can have for breakfast that don't involve a bowl or milk, since usually he's eating breakfast in his car on the way to work. He needs something that will fill him up and give him lots of energy because he doesn't always get lunch at the same time, and sometimes it's a long time between breakfast and lunch. Most breakfast rolls/muffins aren't filling enough or are more sweet than nutritious. I'd heard about "breakfast cookies" that were loaded with granola-type ingredients, but hadn't seen a recipe. Then my September issue of Martha Stewart Living came and, lo and behold - a recipe for breakfast cookies! I immediately showed it to Scott to see if he wanted to try them and he was game, so I decided to try it.

Raw pumpkin seeds, raw sunflower seeds, Craisins, dried blueberries & dried apricots.

I made a few changes to the ingredients, since Scott wasn't totally enamored of some of the dried fruit choices. The original recipe calls for dried mango, dried papaya, and raisins or dried currants. I substituted dried blueberries for the mango, diced dried apricots for the papaya, and dried cranberries for the raisins. The rest I left the same. In shopping for the ingredients, I found that it can be difficult to find raw pumpkin seeds and raw sunflower seeds at the local chain supermarket, unless they have a really good bulk foods section. They can be expensive, too. If you have a Trader Joe's near you, I found all my nuts, seeds and dried fruit there and really reasonably priced. I'm pretty confident that Whole Foods would have them all, too, but we don't have one near us.

I use a chopper for my nuts and chop a handful at a time.

The quantities of this recipe seemed huge to me (except for the dried fruit), and I was skeptical. I mean, it's supposed to make 8 large cookies using 1 cup of batter or 16 smaller cookies using a half cup. So why would you need a whole pound of butter? I suppose that for all of the dry ingredients you would need a lot of fat to hold them together. Anyway, I was right - this makes way more than 16 small cookies and they were by no means small - more like 4 or 5 inches across. When I added the oats to the recipe the dough kept trying to escape from my mixer bowl and it was hard to keep it from clumping on the paddle.

Escaping dough! This recipe is huge. The white area is the dried coconut.


The dough is very stiff and I decided to use the half cup size. Even then, the amount of dough was enough that I patted them down significantly in order to avoid having cookies that were thicker than an inch, which made them spread out enough that I could only get 5 or 6 on a sheet. The fun part was putting the banana chips on top before baking; I pressed mine into the dough slightly to make sure they didn't fall off. This recipe easily made 18 or more very large cookies. I highly recommend a large drink with them - juice, milk or your favorite coffee beverage. And if you're someone who doesn't eat a lot of fiber, make sure you drink a lot of water throughout the day, since this is a lot and you'll need the water to help digest it. And as with any high fiber food, you may notice a slight change in your number of bathroom trips. *grin* My husband commented on its effect on him.

Verdict: My husband liked the one he had yesterday, although he didn't have a drink with him and his only complaint was that he needed something with it, as it felt dry on its own. Not terribly, but he felt it needed a couple of swallows of something to go with it. I had one this morning with coffee and it was pretty good. I think it might be good crumbled over yogurt as an alternative to granola or muesli. If I make this again, I'm definitely cutting the recipe in half (except for the fruit, perhaps), since I'm not sure that my family will eat all of these giant cookies before they start to go stale.

You can find the recipe here.

Thursday, September 13, 2012

On the Menu: Meringue and Two Kinds of Sorbetto

Colette Meringue skirt in denim with t-shirt by Rock Steady clothing. I love this outfit.

 As part of the Colette Patterns Spring/Summer Palette Challenge, I decided to try my hand at the Sorbetto tank top pattern, available on the Colette website and the Meringue skirt, found in The Colette Sewing Handbook. These are pretty much the only garments I was able to get done from the challenge, because I had to pack up my entire sewing room when we moved, plus I was in the hospital for a week with gallbladder issues. Ugh! But I digress. I'm a late-comer to the Sorbetto pattern; I think everyone familiar with Colette Patterns has tried it, not least because it's a freebie but also because there are so many ways to adapt it. I've seen it with and without sleeves; with a box pleat, with an inverted pleat and with no pleat; embellished with piping, lace and buttons or simply plain. People have made it into a dress. The possibilities seem endless.

Because my main problem is always getting a good fit at the bust line, I decided to perfect the fit of the original first before I tried to branch out. A scrounge in my stash revealed some lovely pale blue shirting that I used as a muslin. After much adjusting for my full bust and re-adjusting to take into account the rest of my figure, my wearable muslin looked good enough to start making the final versions. I wasn't completely enamored of the fit, but decided I could fine-tune it with the final products. This was also the first time I'd really used my dress form for bust fitting, as it's a relatively new purchase, so that enabled me to get a good fit at the bust.

Sorbetto Version 1, untucked. I'm still not enamored of the waist shaping and I think it looks better tucked in.
The final versions fit in my color palette far better than the muslin, naturally. Version 1 is made from a beautiful quilting cotton that has an amazing hand and which has been sitting in my stash for about 15 years. Yes, you read that correctly. It's a bit more country/Americana in feel in terms of the print, but I love the maroon and cream of the flowers against the cadet blue background. I chose some vintage lace from my stash as a simple embellishment on the pleat and finished it with ready-made maroon bias tape, since I've made my own bias tape for a few projects lately and I'm over that. Plus, I was impatient to finish it after all the time I spent fitting it. I may tweak it more later by adding a dart at the hemline in order to fine-tune the fit at the waist and to compensate for the added fabric that occurs when I do the FBA.

Sorbetto Version 2 with piping and buttons. I'm digging the fit on this more than this first.
Version 2 is a really nice geometric print in stripes - black, navy and maroon on cream. This fabric is something I bought specifically for this challenge, mostly because I love the print but also because the quality is fabulous for quilting cotton. It's from the Aunt Grace fabrics by Marcus Brothers and it comes in a green and orange color way, too. I used navy piping to accent the pleat this time and navy vintage buttons from my stash. Ready-made bias tape again, this time in navy. I made both versions using French seams, so there are no raw edges.

Both of these tanks look super cute with my Meringue skirt. I'd been contemplating this skirt and looking at all the different versions I'd seen online - solid vs. print, light vs. dark, etc. I found myself returning to a denim version done by Sarah at Rhinestones and Telephones, and thinking that it seemed like the perfect everyday skirt. I think she says she wears it at least once a week. So here's my version, in non-stretch dark denim.

This is a size 16 with no alteration other than taking it up an inch in length. Ideally, I think I probably should have taken the waist in slightly in the back. Not enough to do a sway-back adjustment but just deepening the back darts a bit. I should note that the fit was pretty good overall before I had my surgery but because I lost weight (and fat!) in the hospital, the fit is not as great at the waistline any more. I plan to take it in a bit at the waist by deepening the darts. What I love about this skirt is how it's a good basic with just a twist (the scalloped hem), and pretty much every top and every shoe works with it, I can wear either Sorbetto with it and throw on my maroon cardigan if I need more sleeve coverage. And it's super cute with my favorite striped t-shirt, as you can see from the top photo.

Monday, July 2, 2012

Peter, Peter, Pumpkin Eater


Okay maybe not a pumpkin eater. But definitely a pumpkin wearer. Mr. T looks good in orange (at least I think so) and in homage to my dad and The Netherlands, I've become fond of dressing him in orange. Plus, there's always the benefit of being able to spot him in a crowd if/when he runs away from me. Which happens more frequently than I care to think about.

This orange isn't as bright as some other things he has, but as soon as I saw this French terry on etsy, I knew I had to have it. It's really a burnt orange color mixed with a dark brown, in a medium weight, which makes it an ideal layering piece. This pattern is from the 4/2007 issue of Ottobre, and it's known among those who use Ottobre due to its round pocket openings, which are such a cool design feature.


I went with a cotton interlock in a car print for the hood and pocket lining, since the cars have the brown, orange and linden green colors I was using in my SWAP (yes, this is part of that). There are some turquoise ones, too. Plus it matches the striped Hilco ribbing that I got from the Ottobre etsy shop. I didn't have a lot of that so I used a plain dark brown ribbing at the waist, since that piece had to be wider.


As you can see, I had a little bit of trouble lining up the stripes on one of the pocket openings, and the stitching that holds the lining to the body of the sweatshirt is a little bit too close to that opening. I was in a hurry and didn't bother to draw a chalk line before I stitched it. Live and learn. The stitching itself is a new decorative stitch from my machine which is even more like a coverstitch in its appearance than the triple-honeycomb, which used to be my go-to for the RTW look.

Tuesday, June 19, 2012

Score!

Sometimes fabric shopping can be a crap shoot, especially when you have a tendency to limit yourself to the clearance rack. JoAnn's Red Tag fabrics are almost always polyester nightmares, though in the past I've found amazing treasures, like cyan-blue stretch cotton french terry, floral-print white cotton twill, and black cotton with an amazing multi-colored embroidered border.

A few Saturdays ago a trip to JoAnn's ended up being one of those really good days for finding fabric, and here's what I got:

-Yellow cotton eyelet, dyed with a natural dye:


Maeve picked this out for part of her summer wardrobe. This should be fun to work with.

-Navy and white polka-dot chiffon. Yes, it's polyester, but I've been looking for a polka-dot chiffon to make the Taffy blouse from the Colette Sewing Handbook, and this fits the bill perfectly:


-White cotton stretch woven with red embroidery:


Not sure what this will be, but I'm thinking a blouse of some kind.

-Two different rayon/Spandex knits:


These will be shirts or summer dresses/tunics, I think.

-The pièce de résistance, lightweight stretch cotton sateen in red and white butterfly print on navy ground:


The printing on this fabric is phenomenal ( I know it's not obvious from this blurry photo). Normally in a dark stretch print on white fabric, when the fabric is stretched you can tell that it's printed on white because the white will show. Not this one. I've been planning a Rooibos dress but couldn't find a fabric that grabbed my eye. As soon as I saw this print it was like it shouted "Rooibos!" at me. Now I just have to buy the pattern.

Saturday, May 19, 2012

Bath Time!


Mr. T's birthday was last month and he wanted a bath robe. I'd been thinking of making him one since the winter 2011 issue of Ottobre had robes in it but hadn't gotten around to it. A birthday present is always a good excuse for making something, and it was a change from the other things I'd been working on.


This pattern calls for the robe to be made up in 2 different fabrics, with the outer layer being a poplin or other similar woven fabric and the inner layer being made of flannel. Flannel is okay if you're looking for a warm robe but doesn't work so well for absorbing water when you get out of the bath. I decided to make the inner layer out of terry cloth so it would be more useful as an after-bath garment. The good thing about this pattern is that the lining isn't made to be sewn right sides together and then turned - the robes are constructed as 2 separate pieces, with the hood also being separate, then putting them together so that the hood is sandwiched between the 2 layers but the wrong sides of the 2 layers are together. Which means that you need to finish the edges with a bias binding or else you're left with raw edges. Of course, this enables you to use a fun contrasting fabric.


I used a cotton woven from JoAnn's in a rocket ship print that Mr. T chose himself. Actually, he carried that darn bolt of fabric all over the store and didn't want to let go of it, until Scott handed me the bolt and took the boy out to the car. The blue cotton terry also came from JoAnn's. The bias binding is red with a white star print, left over from the girls' Delft dresses from 2 years ago. I also used it for the pocket, one side of the belt and as belt loops - the pattern doesn't call for belt loops but without them you'd have to sew the belt on at the back, and I wasn't willing to sew through the terry layer to do that.
Here's a shot of one of the belt loops:


This was remarkably easy to do, although the bias binding is slightly time consuming. This pattern seems to either run small or my son is extremely large for his age (I've been told this on more than one occasion) because this is a size 104 and it fits perfectly. Normally he wears a 98 but I know from experience that European robes always seem to be shorter than the ones you find in the U.S., and I wanted to be sure it would fit, especially since the terry was thicker than the suggested flannel. Also, the hood is shallower than one might expect.

As you can see from the first photo, he's incredibly happy with it and he wears it prior to and immediately after every bath or shower, which is a bit unexpected.


Friday, May 18, 2012

Tutti Frutti


A quick little post about a shirt I made for Gwyn for Christmas. This is the Imke shirt from "Sewing Clothes Kids Love", with the pieced bodice. I actually threw this together after I bought her a pair of pants for a Christmas gift and felt like it needed something to go with it. So I dove into the stash and found these 2 fabrics, both purchased from Fabric Fairy about a year ago. These are really nice weight cotton-lycra knits and I think they're from Flapdoodles, but I could be wrong. The ribbing at the neck is orange and red Campan knit by Hilco that is leftover from a piece that I scored on ebay and used to make the dinosaur shirt for Tallon. I felt like it needed a little contrast and the orange was just the right pop against the aqua background.


Of course, I couldn't just leave it un-embellished - this was for my girl who loves all the extras and likes to go through my stash of iron-ons, patches, ribbon, etc. to pick out the right stuff. I felt like the fruits needed to be somewhere else besides the bodice, so I cut out some of the shapes and fused them to felt, then stitched around them to be on the safe side. Then I cut out the felt and sewed the shapes to the sleeves as though they were patches - 3 on the left sleeve and 1 on the right.


I added some Farbenmix ribbon "Helga and Friends" to the right sleeve before I sewed on the fruit patch; I only used it on one sleeve because I don't always like things to be balanced, design-wise. It makes it more interesting. On the left sleeve I used a yellow and orange flower patch that I had in my stash and, of course, there is the obligatory Farbenmix label on the right sleeve. I love how this turned out and so does Miss G.

Thursday, May 17, 2012

Mr. Green + Jeans

It never fails to amaze me how many pairs of pants Mr. T actually needs. It took me forever to work my way through the SWAP I was doing for him, and I'm still working my way through it. These pants are both made from the same pattern, just in different fabrics.

This pattern is from the Fall 2005 issue of Ottobre, the #15 jeans/velveteen pants, in size 98. Let me say that this style is an extremely wide leg, so if you don't like that style of pant, this is probably not one you'll like. I like the knee patches and unique pockets on it, as well as the fact that it has an elastic waist, which makes them easy for the boy, since he doesn't have to struggle with a zipper when he has to use the potty. Funnily enough, the wide leg comes in handy for that, too, since he does better without pants around his ankles and I find that with these pants I can slip one leg out without having to remove a shoe. So much better in a public bathroom, right?

"Treasure pocket" made from contrasting color.
Anyway, these are made up in a kiwi-green brush denim that is an unusual color but it works really well with a lot of the things I've made in the SWAP. There is dark brown topstitching on the pockets and seams, including the knee patches. On this pair I chose to use a different fabric for the little "treasure pocket" on the left knee patch; I used tan-grey denim left over from the knight jeans that he outgrew. The cool thing with the pockets is that you only need to finish one side and the bottom, as the outer side is inserted into the side seam of the pants.


Back view
The second pair from this pattern was made from blue denim with brown pin-stripes. The magazine shows a denim version of these pants which uses the wrong side of the denim for the knee patches as a contrast. I didn't really like the wrong side of the denim, but I decided to jazz things up by alternating the direction of the stripes  on the knee patches, as well as on the back pocket and hip areas. I like things colorful, too, so I decided to use a red thread for the topstitching. I love the way this turned out.

This is an easy pattern to put together, although the stitching on the pockets and the knee patches is time consuming. You could just as easily eliminate the knee patches and the decorative stitching on the pockets though, and just have a basic wide-legged pant. I did have one problem with the instructions and that was with the waistband. I just didn't get it. I made the green version first and tried to follow the instructions but it just didn't work for me. I thought maybe I was tired and I looked at them again in the morning and no, still not working out. I decided to just serge the edge with the seam allowance, then attach the waistband, so that the served edge would be on the inside. This way you end up seeing the edge but it's not unfinished. The instructions call for the inside edge to be turned under but I seemed to not have enough fabric left. Perhaps my elastic was too wide, owing to the fact that it doesn't come in metric here in the U.S. That would explain it. In any event, I love the way these turned out and they look adorable on him.


Wednesday, May 16, 2012

T-Shirts for Mr. T


I mentioned before that I'd traced some Ottobre patterns and by the time I got around to cutting them out, he'd grown enough that they wouldn't fit for long. I figured this out by cutting out the shirt you see above. This is the #12 shirt from the 4/2010 issue. I'd traced and cut it out in a 92 and sewed it up, only to discover that T. had grown enough for it to be rather snug on him. The shirt is supposed to look like two in one, with the hood in a contrasting fabric, so I dug up some brown and red Campan knit from a previous shirt I'd made him and used that for the hood. I'd already used olive green ribbing because it goes so well with the Ooga print but it didn't look good with the brown and red, so I went with the maroon ribbing on the hood. It definitely gives the impression of two different shirts, although it's obvious from the fit that it's just one.

border="0"alt=""id="BLOGGER_PHOTO_ID_5719466894329964178" />

Here you can see the front pocket a bit better, although it still blends into the body of the shirt. I used the triple-honeycomb stitch on my machine to imitate a RTW coverstitch. Anyway, it works well and I used the same stitch when I made the drawstrings for the sweatpants in the previous post.
Having realized that the boy needed a 98, I cut out new sizes for him in 2 other shirts. The first is the Hippotamus Hoppulainen shirt from the 6/2010 issue. I like this shirt because I think it lends itself to a mix of fabrics while still looking sporty and boyish. For this I used the Michael Miller dinosaur interlock and a piece of orange and red Campan knit. That Michael Miller stuff shrinks like nobody's business and it's super soft! Maybe that's why it shrinks so? Anyway, the ribbing is a beautiful turquoise from JoAnn's. I wish it were slightly more green in color but I like the contrast of the turquoise with the orange.


This piece of Campan was really small - not even a half meter, so I had to really work to fit all the pieces when I laid it out. As you can see, I used the stripe for the front, back and the stripes on the sleeves. This shirt goes really well with the brown sweatpants in the previous post.


Last shirt in the list is the Pistachio-Chocolate reversible hoodie from the 4/2009 issue. I wanted something to match the blue sweatpants and dug out a printed stripe knit that I'd used for outfits for the girls about 4 years ago. I'd used it for an accent to a print, but it seemed like a good boy fabric. Then I dug around in my stash and found the world's softest navy cotton knit this side of paradise - totally serious about this. I want to curl up in it. Anyway, add to that some olive green interlock and some maroon ribbing and you get this:


I decided that I wanted the pocket and hood on the stripe side to match - hence the decision to do both in green. I used that tripe-honeycomb stitch again for the pocket hems and as topstitching on the sleeve hems. The navy side would have been too plain with a navy hood, hence the stripe. T. loves this shirt and wears it a lot with either pair of the navy "soft pants". It's his "cozy" outfit. I haven't gotten him to wear it with the navy side out - I suspect he likes the way it feels against his skin too much. But it would look fantastic on the navy side with the sleeves rolled to expose the stripe on the other side. This shirt is pretty heavy and he gets hot pretty easily, so I don't have him wear a shirt under it, though you could if you used thinner knits, as it's cut quite roomy. My only problem with this shirt is that I forgot how much the stripe fades, since it's not yarn-dyed but printed. Ugh. But he doesn't seem to mind and it gives it a sort of worn-in look that is generally achieved in RTW with acid washes and the like.