Showing posts with label Halloween. Show all posts

Thursday, November 21, 2013

Tales from the Sewing Crypt


It's Halloween-time again and that means that my sewing machine is going full-steam ahead. This year Maeve decided to wear her costume from last year, so I don't have to try to top that one! However, this year I have to make a costume for the baby (yes, I'm masochistic like that), as well as Miss G., T-bird and myself. Luckily, they should be fairly easy to do, with the exception of Miss G's.

Gwyneth decided that she wants to dress as Merida from the movie "Brave" this year. I've done several Disney princesses - Maeve was Cinderella and Snow White, as well as a sort-of Sleeping Beauty (the dress was pink, anyway). Anyway, I was kind of hoping that Gwyneth would opt for the Snow White costume this year and give me a break on costume sewing. Of course not. Merida is her favorite princess and I have to agree with her on that, since Merida is the one princess who doesn't end up falling for the prince at the end, and is actually the one who does the 'saving'. Tallon decided that if she was going to be Merida, he wanted to be one of her brothers the triplets.

At first I was hesitant but then I decided that this was a good idea. Normally I'm a stickler for authenticity when it comes to iconic costumes like the Disney ones, but I'm taking a different view this time. Here's why: there is plaid involved and a kilt. I could make a kilt, but it would be time-consuming and I wouldn't be able to find a plaid that was the same as the plaid in the movie. Since that's the case, I decided to go an easier route, unusual as that may be for me. Tallon already owns a kilt in our clan tartan and Gwyneth, Maeve and I have sashes in the same tartan. How easy is it to just have him wear our tartan? Then all I have to do is make a green shirt to go with it and I'll have to do very little sewing. I like this idea.

The Merida dress, however, is more difficult. We decided on this project before McCall's put out their Halloween patterns and apparently they have a 'licensed' Merida dress pattern. I personally don't like it that much and since it wasn't available, I scoured online pattern sources until I found a pattern that most closely resembled the dress from the movie - McCall's 5207, which is currently out of print. I got my copy on ebay and I'm sure there are several copies out there. The thing I like about this pattern is that it runs up into the larger girl sizes (12, 14) so I could make her another dress from this same pattern when she's older. To keep that option open, I traced the pattern pieces. I will be altering the sleeve construction to make it do what I want (not surprising) and I'm adding embroidery to the neckline and hem. Yes, I know that in the film Merida's dress is plain, but I'm not sticking to the authentic version, remember? Besides, I need to justify having the embroidery machine and this is a good reason. That and the dress will look that much better when it's finished. Lastly, I'm going to do hand-made eyelets on the back (it laces up!), rather than apply the metal eyelets which never stay properly, anyway. And it's a good excuse to practice making eyelets by hand.

Merida wig before haircut.
Accessory-wise, Gwyneth already has a Merida wig that she got for her birthday last year and I ordered a bow-and-arrow from the Disney store so it will look authentic. Mr. T is blonde and insisted on having a wig too, so I bought a cheap Merida wig from Party City and I've cut it down to look like a boy.


Here you can see the wig in the middle of the trimming process, after I'd cut off the long pieces at the back and on the sides. I was concerned that I would cut too much off and then I would have wasted $15 on the wig, so I went slow and only cut a bit at a time. The triplets in Brave are drawn with curly reddish hair that's short on the sides but the front bangs are puffy and stand up quite a bit, so I didn't want to cut too much from the front. The trick was getting it to not look too much like Merida with short hair. Here is the end result, from front, back and side:


 As you can see, I tried to make the back look as natural as possible, cutting it short but leaving enough that you can't see the wig base. I also needed it to look a little messy, otherwise the curls would look too girly. I think I managed to get a good balance. This wig was in the section for littler girls and I think it's a tad small for his head, but that's okay because that way the curls aren't too overwhelming. Overall it looks pretty close to the triplets' hair in the movie, but I think it's  best judged with the entire costume, and that will come next time.

Tuesday, October 30, 2012

Adventure Down the Rabbit Hole, Part 3: The Queen's Bodice

An Alice in Wonderland needs a Red Queen. As I mentioned before, my oldest decided that she preferred the costume worn by Helena Bonham Carter in the recent Tim Burton version of the classic tale, rather than the standard animated Disney version. I don't blame her - the Tim Burton costume is far more interesting. It is, however, quite an undertaking but since I'm not one to shrink from a challenge, I went with it.

First, we decided on a pattern for a jumping-off point. Simplicity actually makes a pattern for the Red Queen and Alice, based on the movie costumes but I didn't like it and neither did Miss Maeve. It doesn't really do a good job of copying what you see in the film. So I decided to go with McCall's 5954, view E. It has the same type of sleeve as the original, and though it doesn't have a separate corset bodice, I can give it the illusion of one.

The skirt isn't the same as the original, but I'm loathe to have her dragging a full-length overskirt around. I made a sketch to indicate the changes. I'm no fashion illustrator, but you get the idea.

As you can see, there are some small differences from the original. First, I decided to add some hearts in order to make it more recognizable as the Queen of Hearts. My daughter, apparently, doesn't like the idea of being called the Red Queen, since that's a reference to the other Alice book, Through the Looking Glass. The movie happens to be an amalgam of the two, but that's another blog post altogether. Anyway, I figured that not everyone had seen the movie or might remember the costume, so we added a heart at the center of the bodice front, and then hearts along the bottom of the skirt. The original costume has a velvet bodice, with a gold silk center panel. I had some leftover black velvet from another project in my vast fabric stash, so I used that and made the center portion from gold damask upholstery fabric.

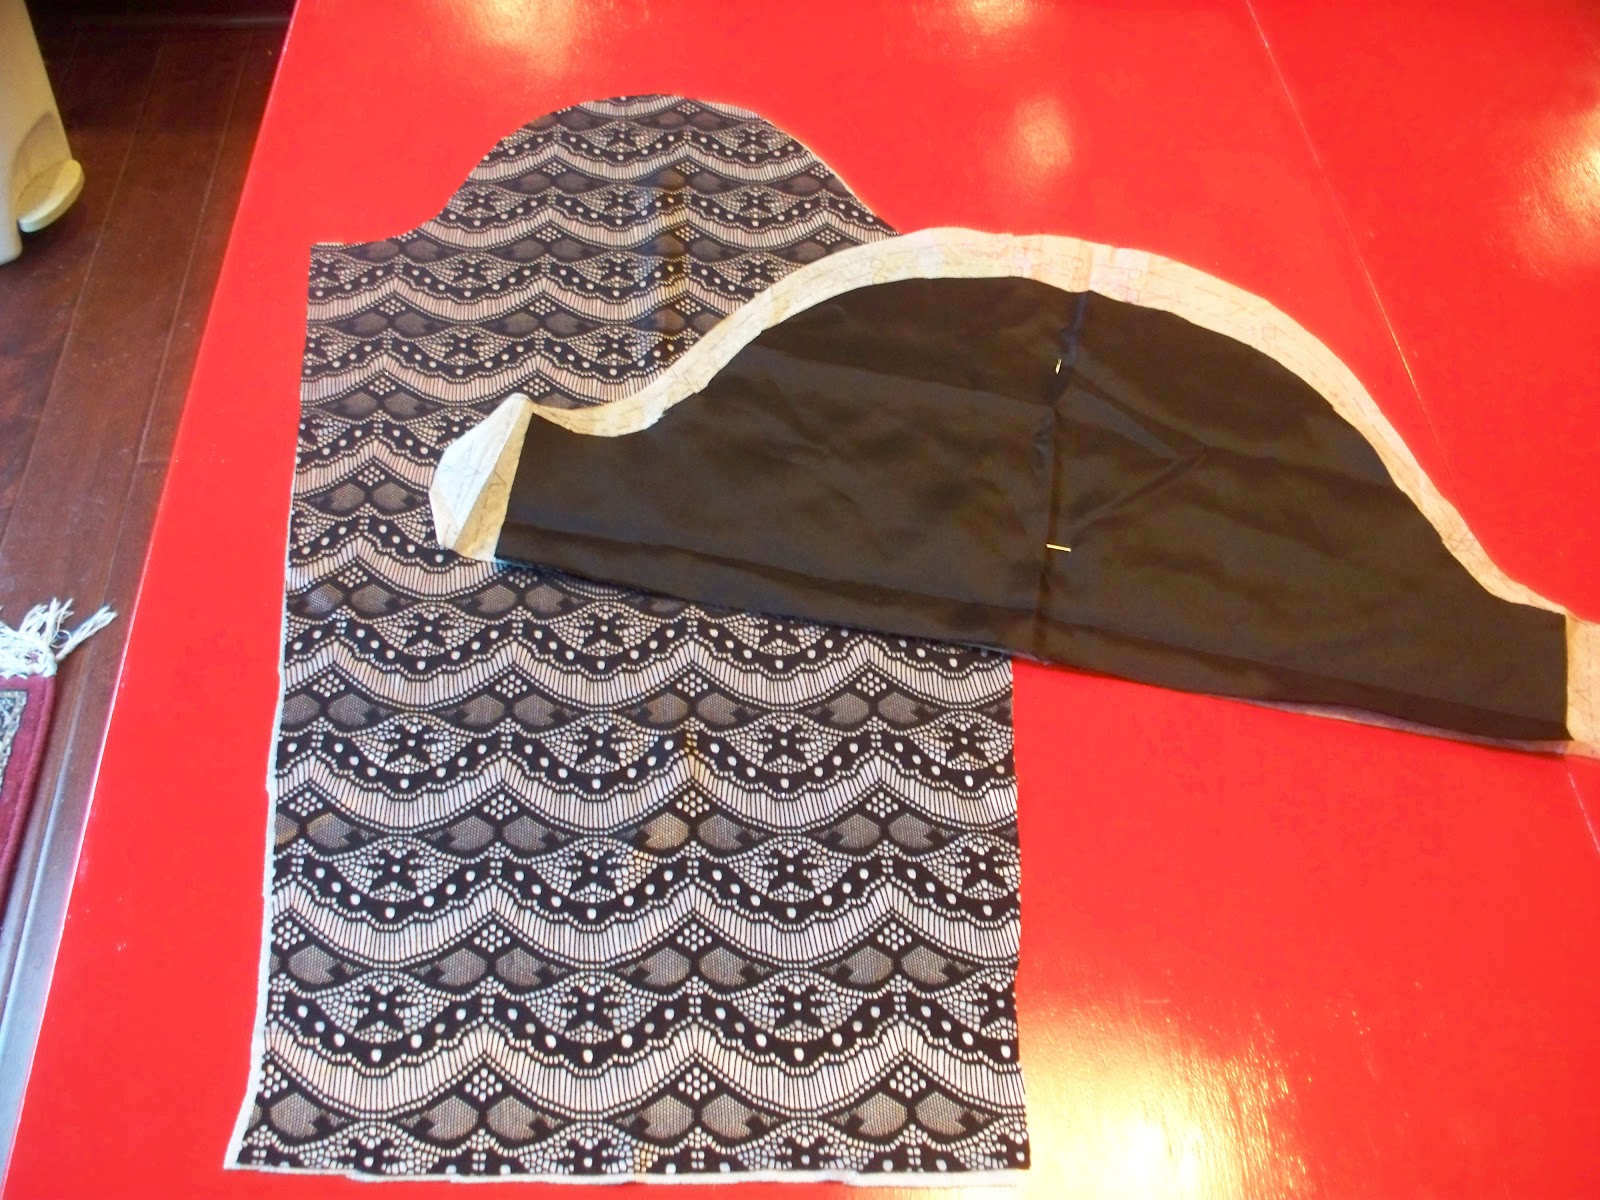
The gold is darker than the original costume, but it's as close as I could get without spending a fortune. I couldn't tell from photos online what kind of fabric the over-sleeves were made from, so I went with black taffeta from my stash. The under-sleeve of the original is a black net with an underlining of a light gold fabric. I substituted a bonded lace fabric for this, and it works pretty well.


Of course, the sleeves themselves are decorated with fred ribbons, both on the puffed over-sleeve and on the longer under-sleeve. The originals have some kind of black embellishment on them and I couldn't tell if it was sequins, beads or something entirely different. I decided to use a combination of black sequins and black ribbon roses, and the effect is pretty similar to the original:

I did all this bead and sequin work by hand. It's taken me a while to do it, since I have to do each one individually, but I've been doing this embellishment while waiting for the small ones at gymnastics lessons, and even did some while Miss Maeve was at an Irish dance competition and wasn't dancing. Of course I stopped sewing to watch her dance. Eventually there will be beading on the top portion and all kids of wonderfulness - I hope. I'm kind of running out of time! But I have all morning and afternoon to finish this, plus time at gymnastics tonight, which should be enough, as long as I can get the White Rabbit done today. That one is going together pretty quickly, thankfully.


Friday, October 26, 2012

Adventure Down the Rabbit Hole, Pt. 2 - Alice


I was planning on starting my Wonderland costume extravaganza with the Queen of Hearts, but that would mean that I need my oldest to be able to drop what she's doing every couple of minutes so that I can fit the muslin of the dress bodice and she's been inundated with homework. Ah, the travails of middle schoolers! Since she wasn't really available, I moved on to the Alice costume, since I knew it would require a bit of hand work for the hems and lining, and I like to have hand sewing to do whilst the small ones are at gymnastics and I sit in the bleachers, watching them.

I made a few alterations to this pattern to make it look the way that I wanted, but not a lot. The only change I made to the dress was the addition of a collar. There are many Alice patterns out there and the one I wanted had a dress with a collar and a separate pinafore. That one wasn't available at my local JoAnn's at the time, so I went with this one:

As you can see, this dress doesn't have a collar and the pinafore is not a separate piece. This pattern actually calls for the bib to be sewn directly to the bodice, with the apron skirt being a separate piece, sewn to a ribbon and then tied around the waist. I knew my Gwyneth was not about to go for that, since she is a stickler for authenticity as much as I am. I recalled a shirt in one of my back issues of Ottobre which has a similar collar and traced that out, but when I tried to see how it would fit with the dress neckline, it was clear that it wasn't going to work. So I skimmed through some other issues with the vague notion that there was a dress with a peter pan collar in one and, to my delight, found this dress:

I traced off the collar piece and added giant seam allowances. Normally I use a 1cm seam allowance with Europeans patterns, but the dress pattern had standard 5/8" seams, so I used that width in order to keep everything the same. The first try didn't work when I tried to attach it to the dress - the curve was too deep for it to lie properly. So I cut off the entire seam allowance and re-pinned it and found that it was the perfect size. Thank goodness, because I didn't have enough of the blue to make another one and was reluctant to go buy more. A make it work moment that worked out.


The pinafore was a different story. First, I curved the neckline slightly and used the size 7-8 for the bib. I wanted the bib to be in front and in back, so I cut 4 pieces and sewed the shoulders together in pairs, then stitched them together along the outer edges. Next I turned them right side out and used bias tape to bind the neckline. Unfortunately for me, the bias tape is slightly yellower in color than the bib of the pinafore, but I didn't notice that until I had sewn it on all the way. It really looked white when held next to the bib, so I'm not sure why there is that subtle color difference. Anyway, I used the pattern piece to cut the correct length of apron but I used the entire width of my fabric in order to make the apron skirt fuller. This was important to me, since the skirt of the dress is really quite full and I felt that the narrower width looked kind of skimpy against it. I gathered the top edge, then sewed narrow hems at the sides.

The pattern calls for a wide ribbon but my kids like their Halloween costumes to be dress-up clothing, and that means they get washed. Ribbons don't launder well, so I made a waist tie out of the same white muslin as the apron skirt and bib. I interfaced the portion that would be sewn to the skirt and bib, then sewed the skirt to one side and the bib to the other. I kind of just made it up as I went along, though I did use the pattern pieces as a guide.


All in all, a highly successful costume, in my opinion. The thing that was great about this one was that it did require a little bit of hand finishing, which allowed me to have some sewing to do while I watch the kids at gymnastics. I hate sitting there with nothing to do and I always feel like I'm wasting time that could be spent in front of my machine. Now that Alice is done, I'm moving on to the Red Queen. I lucked out, because Maeve is getting big enough that I don't have to do as many alterations to the adult-sized pattern in order to make it fit her, so I can pretty much just start cutting out. But I'll talk about that in a different post.

Thursday, October 4, 2012

An Adventure Down the Rabbit Hole, Pt. 1

So it's that time of year again - fall. And that means Halloween is just around the corner, so you know that I'm getting ready to start on a massive amount of costume sewing. Every year, it seems, the costumes get more and more elaborate and I suspect I missed my calling somewhere along the line. This year's sewing promises to be no exception, since the 3 have decided to go as characters from a popular book/movie. And not just any characters, oh no. They have chosen one of the most iconic children's books and characters out there. And no, I'm not talking The Hunger Games and Katniss, although I'm sure Maeve would jump at that if given the chance and she quickly spotted a pattern for it in a pattern book at JoAnn's. No, I'm talking Alice in Wonderland, and the characters of Alice, the Queen of Hearts/Red Queen, and the White Rabbit.

Now, given the ages of my children, it's clear who is dressing as Alice and the White Rabbit and it makes sense. Their costumes really won't be difficult to make, although I plan on making some changes/additions, as always. For T I'll be using the standard McCall's pattern # 6101 for the bunny suit, but I'll also be making a waistcoat (aka, a vest) with a large pocket for his pocket watch (which I am making out of wood) and we'll also have a bow tie or ascot. I'm leaning towards bow tie as that's the iconic Disney animated image; Scott seems to have a fondness for the ascot idea, since the newer Tim Burton version has the rabbit dressed in a shortened version of a frock coat, worn with a waistcoat underneath and a jabot of lace at the throat. My 3 year-old son is probably not going to tolerate a jabot of lace, though he may tolerate an ascot. He's already running around saying, "I'm late! I'm late!"

For Miss G I've also chosen a McCall's pattern, # 4948, mostly because the Simplicity one with the collar wasn't in stock at the JoAnn's I go to and I wasn't waiting for it. Naturally the dress fabric is a lovely sky-blue cotton with a white cotton muslin pinafore. I plan on adding the peter pan collar to the dress, and I'll be making real ties for the apron, rather than using the ribbon ties that the pattern instructions say to use. Add white tights, black Mary Janes and a black headband and you've got classic Alice.

The real challenge, though, is Maeve. She decided to dress as the Queen of Hearts but she wasn't really sure that she wanted to go with the animated version's costume, since she really liked the more Elizabethan look of Helena Bonham-Carter's Red Queen. (photo via: http://alice2010.blogspot.com/2009_07_01_archive.html)


After looking at patterns from which to base this look, I chose McCall's 5954, and then started to think about modifications that would make it look more like the photo above. First, we decided to use black for the bodice, except for the middle portion, which will be gold, with red ribbons to imitate the cording on the corset-style bodice of the movie costume. The sleeve puffs will also be black - either in taffeta or velvet, depending on whether I have enough black velvet in my stash, although taffeta will probably hold the shape better than rayon velvet. The red ribbon trim on the sleeves has some sort of black embellishment but we couldn't find any ribbon like it, so we've decided to sew black ribbon roses to the red ribbon in order to achieve a similar look. The lower half of the original's sleeve is a netting; I found a remnant of light beige-y fabric with a lace overlay that is very similar in look, and also more practical for trick-or-treating on an October evening. The cuffs look like they're made from a dotted chiffon, cut on the bias, but so far I haven't been able to find anything similar to it in the store. Looks like a trip to Hancock Fabrics might be in order. In the meantime, I've seen others' copies of this outfit which have used ruffled eyelet trim, but I think that the cotton looks a bit cheap next to the other types of fabric, even if it does give a similar look. Also, I'm going to have to add some black panels and the white shirt collar portion to the bodice. The only thing I really have to worry about is the size of the collar, but that shouldn't be too difficult to reproduce. I'm also considering a slight deviation from the movie dress by adding a large heart appliqué on the bodice, in order to inject more of the red/hearts theme.

The skirt portion will be more difficult to imitate. In the movie costume, the Red Queen has a red underskirt, with the front panel made of a red with a heart motif in black and gold, and an overskirt in a gold brocade. The pattern I chose has an overskirt that is shorter and draped - more like a polonaise, though they refer to it as a peplum, for some reason.

Dress with a polonaise, via http://historicalfashion.tumblr.com/

I could alter the pattern so that my version has a longer overskirt and then the underskirt, but there are 2 difficulties that present themselves if I do that:

1) This means more fabric, which is expensive and impractical when it comes to a Halloween costume for a 12 year-old. If this were something for a convention, like DragonCon or some other mega event where people would be judging her on a costume's authenticity, then I might. But's Halloween and she needs to be able to move. Also, she'll probably want to wear this at the next feis for Irish Dance, since they're having a costume special event. Extra fabric would get in the way, and I'll need to be able to drape the underskirt up à la polonaise just so that she can dance the reel in it.
2) A large overskirt would require hip rolls to support it, as Maeve has no exactly got large hips. I have no desire to make hip rolls for her to wear or to ask her to wear them. So I'm going with the shorter overskirt.

In order to achieve a similar look to the movie costume, we decided to use a dark gold brocade for all but the front panel of the long skirt. The front panel will be red taffeta with a flocked vine design in black. The shorter draped overskirt will probably be black, but we haven't finalized that. Also, we're giving a nod to the traditional Queen of Hearts' costume with heart appliqués on the skirt. Normally they're on the front panel but we decided to place them around the hem. While this is a departure from the Tim Burton costume, it's a way to reference the more traditional Alice that the other 2 costumes follow. Plus, it's a way of making our own statement, since there's always a risk that people won't make the connection to the newer movie and end up thinking that she's just a queen.

I'm also going to be on the lookout for lace-up granny boots at the thrift store that I can spray-paint gold, and I'll be looking for striped tights or something similar. I'm going to try to document the process of these costumes as much as possible, though I can't promise every detail will be photographed, since I frequently don't know where my camera is. I'll try, though. On with the sewing!

Sunday, April 29, 2012

Happy Halloween


Time to get caught up on posting the things I've been making.
October was a crazy month, full of sewing for the kids - well 2 of them, anyway. Halloween costumes at our house are always an "all or nothing" kind of deal. I always feel compelled to make something even more fantastic than the year before. This is good for my sewing skills but not always good for my sanity and certainly doesn't always mesh with my time constraints. But I persevere. Fortunately, this year Gwyneth made the wise decision to dress as Cinderella and I already had a costume that I'd made for Maeve, back when she was 4. Okay, I kinda urged Gwyneth to wear the Cinderella dress so that I didn't have to make a full-on Belle dress. But she agreed that it was a good idea and now she has decided to wear it for her birthday party in a week. Then, naturally, I'll have to take it to the cleaners. But I digress.
So first up this year we have Tallon as an elephant. I'm exceedingly pleased with the way that this turned out, if I do say so. The fabric was a genius choice, imho, because it really looks like elephant skin. This was a happy accident. I'd gone into JoAnn's to find some faux-suede for the costume and right next to it was this faux suede which had been treated in some way so that it looked like distressed leather/skin. The moment I saw it I knew it was the right choice. And it turned out that I was able to recycle an old french terry sweatshirt of mine that was barely worn by using it as the hood lining.
The pattern went together surprisingly well (McCall's 6105) although I did make some modifications to it. As this model contains patterns for 4 or 5 different animal costumes, it only comes in 1 size, rather than the standard multi-size range that most modern patterns come in. Tallon is a big kid. Last year I made a size 2 of the lion from this same pattern and length-wise it was a perfect fit, with little extra room. The hood portion of the size 2 didn't even come close to fitting his head, something I discovered after I'd made it. Anyway, in order to avoid this problem I sized up, thinking that I could always shorten the legs and arms. The hood ended up still being a bit too small, but that wasn't a hug problem the way it was last year. The genius in sewing the size 4, rather than the size 3 he wears in street clothes, is that I was able to use elastic and gathering stitches in combination to hike up the legs and achieved a really cute 'wrinkled elephant knees' look.
The other modification I made was to leave off the soles of the feet. The pattern was meant to have feet like a sleeper but really - how practical is that for a 3 year-old who will be outside trick-or-treating? Not very. So I simply attached the hoof pieces, backed with some sturdy foam that is used for headliners in cars. It was left over from another costume project from Maeve's toddler years (Blue from Blue's Clues) and was just the right weight and stiffness to keep the shape of the feet while still allowing Tallon to be able to wear his shoes. In this photo you can see the modified feet, as well as the "wrinkled knees" effect.
T was thrilled with the whole thing and went around stomping his feet -"walking like an elephant" - and trying to trumpet. He pretty much got rave reviews at every house we stopped.

For Maeve, the planning of the next Halloween costume usually happens the day after Halloween. So I was surprised that September rolled around and she still didn't have an idea. Her friend, K., was going on and on about how she wanted to be an "Irish Dancer Vampire" and telling Maeve to be a "Ballerina Vampire". I guess anything is a Halloween costume if you tack the word vampire onto the end of it. I convinced Maeve that this was not a good idea, since it usually lends itself to people asking "What are you supposed to be?" and then a puzzled look when you tell them. If it requires explaining, it's generally not going to work as a costume. I wasn't opposed to the idea of a vampire, though, since it's a traditional scary costume that requires no explanation and can look cool when done right.

After perusal of the Chasing Fireflies website, Maeve determined that she wanted to do an 18th century vampire costume, with a dress à la Marie Antoinette. The costume on the website was about $150 and didn't include the accessories - no way was I going to buy something for Halloween that cost that much when I could make a similar costume for a fraction of that. I searched for a pattern that was similar and then we went shopping. This was also a McCall's pattern, 5731. The problem with this pattern is that it's sized for girls up to a size 8, then it skips on to misses' sizes. I had to take the womens' size small and then cut it down, which required making a muslin of the bodice. I probably would have made a muslin anyway, just because the red brocade fabric was kind of expensive and I didn't want to buy more. So, a purchase of red and black poly/rayon brocade and some wretched black acetate taffeta was made, along with some black net lace and red scalloped lace trim and I felt like I could start the costume.
In all it went together pretty smoothly, with the minor exception of the bodice 'lacing', which I forgot to sew on prior to the bodice construction, in my haste to get started. An easy fix, though. I simply did it afterwards, and then covered the raw ribbon edges with the trim. When it came time to put lace at the neckline, we opted for a double-layer lace trim, since the neckline seemed a bit low for someone Maeve's age. Then we added a choker made from velvet ribbon and a cameo from Michael's jewelry section. I'd wanted a more traditional cameo, with a woman's profile, but couldn't find one that was the right color. Then I saw this one with the lilies and thought it was perfect, since lilies are often funeral flowers. Last, but not least, a Marie-Antoinette-style white wig with curls. It was only $10 online and I couldn't resist. I think it really made the look. My only regret is that I didn't have time to make a petticoat so the skirt would stand out better. Better pictures here, here and here.
They all got lots of compliments on their costumes, and that always makes me feel good. People went crazy over T's costume because he's just too darn cute anyway, and as an elephant he was hilarious, trumpeting all the time. They didn't get as much candy as in years past, but that's not really what it's about. It's mostly about dressing up. Interestingly, Maeve's friend decided to just go with a standard vampire costume and when she came to the door and saw Maeve's costume the jealousy was apparent to me, if not to Maeve. Maeve chose not to go with K. but do go out with me and the small ones, which was fine with me. K. is a nice kid, but she kind of gets ignored by her parents (she's the youngest) so she often resorts to telling whoppers in order to feel special and impress her friends and that makes me sad. Maeve recognizes this, so she often ignores the fibs. But I think she realizes that she has it pretty good when it comes to parental involvement compared to K. In all, they had a great time and really enjoyed themselves. The plan for next year? A full "Alice in Wonderland" deal, with Maeve as the Queen of Hearts, Gwyneth as Alice and Tallon as the White Rabbit. Scott has suggested that I make myself a Cheshire Cat costume but I'm vetoing that.